If you are building or have a golf simulator, then protecting your ceiling and walls is very important. In this guide, I’ll show you how to install good golf simulator ceiling protection in your house or garage and protect your walls, doors, or windows, from damage.
Plus, check out some of the top products on the market to install on your ceiling and walls that still look good in your home:
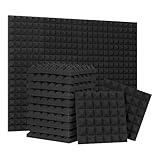
Foam panels
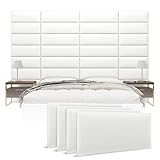
Vant panels
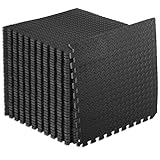
Gym tiles
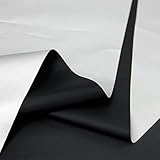
Fabric
Netting
If you have a better golf simulator ceiling protection solution, comment and let us know!
Assessing Potential Damage: What a Golf Ball Can Do
A golf ball can bounce and cause significant damage without proper ceiling protection for your golf simulator.
When hit with force, a golf ball can leave dents, holes, or cracks in the ceiling surface. This can lead to costly repairs and compromise the room’s structural integrity.
Additionally, a golf ball can damage the projector or other equipment mounted on the ceiling, resulting in expensive replacements or repairs. Investing in suitable equipment such as enclosures, impact screens, or net wall extensions is crucial to ensure the safety of your golf simulator setup and prevent any potential damage.
Critical Decisions in Setting Up Your Golf Simulator

Open Setup vs. Enclosure Frame: Weighing The Options
When setting up an indoor golf simulator, it is essential to consider the options between an open setup and an enclosure frame. An open setup means no protective enclosure around the hitting area and impact screen.
On the other hand, a golf enclosure provides a protective layer that surrounds the indoor golf setup.
Without proper protection for a golf simulator, a golf ball can cause significant damage. Stray golf shots can cause cracks, dents, or holes in the wall or roof. It could also damage your home golf simulator software which could be a costly repair or replacement.
To ensure the complete safety of the golf simulator and prevent any potential damage, we highly recommend investing in a golf enclosure frame when setting up your golf simulator. It may be a higher up-front cost, but it provides you the added peace of mind of knowing you have an enclosure that will provide complete protection against stray balls.
DIY Enclosure vs. Buying an Enclosure Package: Convenience vs. Customization
There are two types of golf simulator enclosures to consider when setting up an indoor golf simulator, a Do-It-Yourself enclosure, and a golf enclosure package. Each offers something different in terms of convenience and customization.
Convenience
A DIY enclosure requires you to assemble the materials and construct the enclosure yourself. This can be time-consuming and may require some technical skills that you don’t have.
An enclosure package typically comes pre-assembled or with straightforward instructions for easy setup. This saves you time and effort, making it more convenient.
Customization
A DIY enclosure gives you more flexibility and control over the customization options. You can choose the materials, dimensions, and add-ons according to your preferences.
An enclosure package usually comes with standard dimensions and materials. While some customization options may be available, they are often limited compared to a DIY enclosure.
A DIY enclosure offers more customization options but requires more effort and technical skills. On the other hand, an enclosure package provides convenience with a pre-assembled or easy-to-setup option, but customization options may be more limited.
Ultimately, the choice depends on your preferences, budget, skills, and the level of customization you desire.
Metal Frame Protection: Ensuring Durability

A metal frame is durable when setting up an indoor golf simulator because it provides a strong and sturdy structure to support the equipment and withstand the impact of golf shots.
Metal frames, such as those made from 1″ electrical conduit, are known for their strength and stability. They can handle the force generated by swinging a golf club and prevent any wobbling or movement during use.
This durability ensures the golfer’s safety and the setup’s longevity.
Protecting Your Golf Simulator Ceiling and Walls
Foam Panels and Acoustic Panels: Soundproofing and Safety

Foam and acoustic panels are practical options for soundproofing your home golf simulator space. Foam panels, such as acoustic foam, can be used to protect the walls and absorb noise generated from the impact of the golf ball. These panels are designed to minimize sound reflections and vibrations, creating a quieter environment.
Acoustic panels, on the other hand, can be utilized for ceiling protection. They are designed to absorb sound waves and reduce echo, making them suitable for controlling noise in the simulator.
Both foam and acoustic panels create a more peaceful and enjoyable golfing experience by minimizing noise disruptions.
Vant Panels: Merging Style and Protection

Vant panels can be a stylish and protective option when setting up an indoor golf simulator. Vant panels are decorative wall panels that can add a touch of elegance to your indoor golf setup while offering excellent wall protection.
These panels are made of durable materials that are resistant to damage. They can help prevent dents, holes, and cracks caused by stray golf shots, ensuring the longevity of your walls.
Vant panels also come in various styles and designs, allowing you to customize the look of your indoor golf simulator while providing the necessary protection.
Floor Tiles and Gym Tiles: Creating a Safe Playing Surface

You may not realize that you can use floor and gym tiles for your golf simulator ceiling protection. These tiles offer durability and safety for the simulator setup. To protect the walls, you can use peel-and-stick or glue foam tiles with double-sided tape, providing adequate sidewall protection.
Additionally, for the floor, you can build a DIY stance mat using cheap materials to reduce bounce and cover the concrete. These measures ensure that your indoor golf simulator is well-protected and safe.
These tiles may also be considerably more affordable than other options, which is great for the budget-conscious mind.
Insulation: Enhancing Comfort and Safety
Insulation material is another option to consider when soundproofing your golf simulator. Insulation also helps heat a room if there is no other insulation, to begin with. You can place long insulation strips between wall planks, floorboards, and ceiling protection.
Insulation is likely cheaper than other floor and wall options. However, it can be bulky and not very visually appealing.
Fabric: A Versatile Protection Solution

Fabric can also be used as a protective measure in an indoor golf simulator to safeguard the walls and ceiling from damage caused by stray golf balls. Hanging thicker fabric loosely can minimize the impact of any golf ball that comes in contact.
Fabric can also be purchased in bulk at most carpet and drape stores which can be a good, cheap option for your golf simulator experience.
Netting: A Comprehensive Safety Solution

Netting can be used in many different ways as a safety measure to protect the walls and ceiling from stray golf shots. Netting can be a physical barrier, preventing golf balls from flying around and causing damage or injuries.
Side-netting extensions can also be installed to further protect against shanked shots. Netting is versatile in adding safety to your golf simulator hitting area, but ensuring it is installed correctly is also essential.
Ceiling Baffles and Other Ceiling Considerations: Minimizing Damage Risk

Ceiling baffles are protective measures used in indoor golf simulators to minimize the risk of damage caused by errant shots. These baffles are vinyl or fabric strips hanging from the enclosure’s ceiling.
They act as a barrier, absorbing the energy of golf balls that may strike the roof. Ceiling baffles are designed to provide acoustic and aesthetic benefits, reducing noise and creating a visually pleasing environment.
High-lofted and shanked shots can launch the golf ball straight up, where the ceiling baffles come into play. They provide that extra padding to protect your roof from damage.
Keeping in Mind Room Height When Installing Ceiling Padding
One thing that people may overlook when setting up their indoor simulator is the room height when installing ceiling padding.
The room’s height is crucial because it determines the minimum ceiling height required for the golf simulator setup. The proper ceiling height for a golf simulator is generally 9 feet, but taller golfers may need a ceiling height closer to 10 feet.
Ceiling padding is necessary to protect the ceiling from any potential damage caused by golf shots, primarily if the golfer uses longer clubs and has a higher swing arc. By installing ceiling padding, you can ensure that the room remains safe and damage-free when you play.
You may need to choose ceiling protection that is not as thick if your roof height is not as high as you need.
Golf Simulator Ceiling Protection: Other Strategies and Products
Here are some other products to protect your ceiling and walls that might be of interest:
GoSports Shank Net Attachment
Attaches to all GoSports hitting golf nets
It can be put on the left and right side, depending on what hand you hit
Provides extra protection on shanked shots
Metal Protective Case for Launch Monitor
Made from heavy steel to protect from golf balls and clubs
Three adjustable level legs
It fits most launch monitors
24-Pack Acoustic Foam Panels
Distinct 3D pyramid design offers soundproofing
Package of 24 to cover large areas as needed
The slick black color is visually appealing
Safeguarding People and Equipment in Your Golf Simulator
Preventing Ricochets: Safety Tips and Techniques
To prevent ricochets in your indoor golf simulator and ensure a safe experience, consider the following tips and techniques:
Ensure that the impact screen is the appropriate size for your simulator setup. This helps reduce the chances of the ball bouncing back toward the golfer.
Install foam insulation around the enclosure frame to absorb the impact of the golf shots and minimize the chances of ricocheting.
Mount the projector and other equipment and keep them away from your hitting area.
Aim your shots to avoid hitting the frame directly, as this can increase the likelihood of ricochets. Practice proper swing techniques to control your shots.
Allow some distance between the impact screen and any walls or objects behind it. This provides a buffer zone that can help absorb the ball’s energy and reduce the chances of ricochets.
Follow the manufacturer’s instructions to install the impact screen with the correct tension properly. This helps maintain the screen’s integrity and reduces the risk of ricochets.
Place foam inserts or safety cushions around the enclosure frame to provide additional protection. These can help absorb the impact and prevent the ball from bouncing back.
Install safety baffles or vinyl strips above the impact screen to catch high-angle shots that may otherwise ricochet back toward the golfer. This creates a safety net to prevent accidents.
Opt for a softer mat or turf to minimize the chances of ricochets. More delicate surfaces absorb more of the ball’s energy upon impact, reducing the likelihood of bounceback.
Managing Impact Screen Bounceback: Reducing Equipment Damage Risk
To manage impact screen bounceback and reduce equipment damage for your indoor golf simulator, there are several measures you can take:
Attach the impact screen to the enclosure with just enough tension to keep it flat without making it too tight.
Stand at least 15 feet away from the screen while swinging to minimize the risk of bounceback.
Use foam inserts or safety cushions to protect the frame from ball hits.
Install safety baffles that hang from the ceiling to catch high-angle shots.
Consider using a softer mat or turf to prevent the ball from bouncing back up.
Introducing Children to Your Golf Simulator Safely
When introducing children to your golf simulator, you should follow a few measures to ensure everyone involved’s safety.
Ensure proper supervision to prevent any potential injuries from happening.
Installing proper safety barriers such as protective screens and netting.
Providing proper instruction helps teach them about golf and the different safety precautions they can take.
Try Foam Balls: A Safe Introduction to the Game of Golf
One way to safely have children practice inside your golf simulator is using foam balls. These are considerably softer and lighter than a real golf ball. Foam balls allow children to practice golf without worrying about causing damage to property or injuring themselves or others.
Frequently Asked Questions About Golf Simulator Ceiling Protection (FAQs)
Why Do I Need Golf Simulator Ceiling Protection?
Golf simulator ceiling protection is necessary to prevent any potential damage to your ceilings from errant shots or club impact during your swing.
What Materials are Best for Golf Simulator Ceiling Protection?
Commercially available impact-resistant panels, heavy-duty nets, or high-density foam padding are commonly used for ceiling protection in a golf simulator setup.
How do I Install Ceiling Protection in My Golf Simulator?
You can install ceiling protection by either mounting impact panels or nets directly to your ceiling, or by suspending them from ceiling joists, depending on your chosen material.
Can I Use Any Type of Netting for Golf Simulator Ceiling Protection?
While any strong netting can provide some level of protection, it’s best to use netting designed specifically for golf as it’s made to withstand the impact of a golf ball.
Does Ceiling Protection Affect the Performance of My Golf Simulator?
No, ceiling protection doesn’t affect the performance of your golf simulator as long as it’s installed properly and doesn’t interfere with your swing or the flight of the ball.
How Much Does Golf Simulator Ceiling Protection Cost?
The cost can vary widely based on the type and size of the protection, but you can expect to spend between $100 to $500 on average.
How Do I Maintain My Golf Simulator Ceiling Protection?
Regularly check for any signs of wear or damage, and replace the protection material as needed to ensure continuous effective protection.
Last update on 2026-02-23 / Affiliate links / Images from Amazon Product Advertising API


